In Part 1, I determined what components were needed to turn the motor I found.
In Part 2, I determined what parts were needed to attach the motor to the skateboard wheel.
In Part 3, I created the mount and attached the motor to the skateboard.
In Part 4, I applied current to the motor to correctly label the wiring and hall effect sensors for use in a commutation table for trapezoidal control.
Now we finally will set up our TMS320F28069 Launchpad and DRV8323 Boosterpack to spin the motor using trapezoidal control. Before we begin, the C2000 series of MCUs from TI are quite powerful, but also quite complex. I am going to skip over some of the setup complexity for brevity. I recommend downloading C2000ware from TI for code examples to get started. Furthermore, I am using a C2000 MCU for this project (I plan on covering much more complex control with it in future posts), however the basic foundation of what I cover will work with almost any MCU.
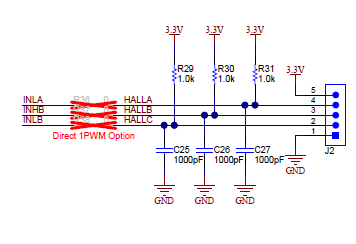
To get started, we need to connect the hall effect sensors to the DRV8323 boosterpack. This particular boosterpack has a header specifically for hall effect sensors on J2. The circuit already contains the pull-up resistors and lowpass filters we need to condition the signal:

The DRV8323 can be configured with a mode to do the trapezoidal switching automatically. This is the “Direct 1PWM Option” that can be enabled on the board with some zero ohm resistors. This mode is detailed further in the DRV8323 reference. I am not going to use this mode because I want the option to run more sophisticated controls later.
I have the boosterpack connected to J1, J2, J3, and J4. HALLA is connected to GPIO19, HALLB is connected to GPIO44, and HALLC is connected to GPIO50 on the MCU. GPIO19 is also an enhanced capture input (ECAP). Enabling the ECAP peripheral still allows us to poll the state of the pin for the commutation table. So, we will use this to time the HALLA pulses for speed feedback while looking at the other hall sensor feedbacks for direction. To make the hall sensor connections easier, I soldered together a board that plugs into J2 and has screw terminal blocks on it for the wires.

EPWM1a, EPWM1b, EPWM2a, EPWM2b, EPWM3a, and EPWM3b will be used to spin the motor.
The DRV8323 gate enable pin is connected to GPIO12. The DRV8323 SPI is connected to GPIO16 (SPISIMOA), GPIO17 (SPISOMIA), and GPIO18 (SPICLKA). GPIO51 is the DRV8323 nSCS pin. The DRV8323 Fault pin is GPIO22 and the CAL pin is GPIO55.
A phase current feedback is ADCINB0. B phase current feedback is ADCINA0. C phase current feedback is ADCINB2. DC bus voltage is ADCINA6. ADCINB6 is the analog potentiometer (we will use this for the speed setpoint). ADCINA7 is A phase voltage. ADCINB1 is B phase voltage. ADCINA2 is C phase voltage.
The boosterpack contains a 3.3V switching regulator that operates off the motor DC bus voltage. That will be used to power the entire system. JP1, JP2, and JP6 need to be removed before powering up the launchpad and boosterpack.
Now connect the motor leads A, B, and C to J5 and a 10V to 60V power supply to J1. Connect hall effect sensor wires X, Y, and Z to the A, B, and C pins respectively and the hall effect power to the positive and ground pins on J2.
Install TI Code Composer Studio and plug in the USB cable to your computer. When you turn on the power supply, the launchpad will execute a program that measures the temperature and lights up onboard LEDs.
We will cover the firmware highlights, program the MCU, and spin the motor in Part 6.